Feeds:
Posts
Comments

Posts Tagged ‘Common Merganser’

Life has kept me busy recently. It’s hard to believe that our Utah trip was three months ago. Finally, here is the rest of the story – my drive back to North Carolina. After dropping David at the Albuquerque airport, I wanted to stay close until his plane was airborne, so I chose an easy place to see lots of birds – Tingley Lagoon, part of ABQ BioPark. Well, there were lots of ducks, but I like ducks. There were also cormorants that breed on the little islands in the middle of the ponds – both Double-crested and Neotropic – but my photos all seem to show Neotropic Cormorants.

Here are a few other birds from this spot, a female Common Merganser, male Northern Pintail, American Coot, and Canada Goose.

After a pleasant hour at the Tingley Lagoons, it was time to head east. I got one more “life” New Mexico bird at the Pajarito rest area – a Chihuahuan Raven that I was able to identify only because I noticed its call sounded different from Common Raven and I recorded it.

At another rest area near Santa Rosa, I saw the Cholla on the right. Then I drove on into Texas where I spent the night.

The next morning, I found one more Texas life bird, Western Meadowlark, at the Donley County US 287 Safety Rest Area. I got photos of a meadowlark that was satisfactory for identification, but this Eurasian Collared-Dove was much more photogenic.

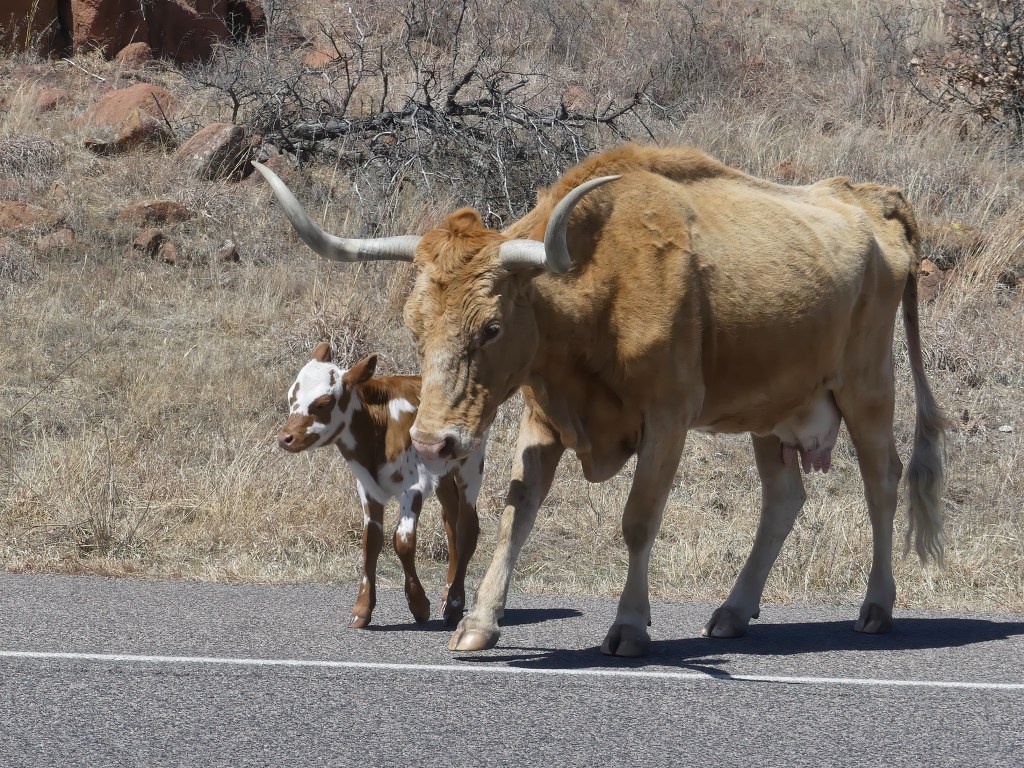
My major stops on the way back to NC were both in Oklahoma, first Wichita Mountains Wildlife Refuge. It is a major birding hotspot, but is more well-known for its other wildlife, notably the bison, longhorn, and elk that roam the park’s 59,000 acres.

Nearly 100 years ago, a herd of Longhorn was established at Wichita Mountains Wildlife Refuge to save the breed from extinction. Here is a detailed accounting of the story. Apparently, there are current debates about whether or not cattle belong on a wildlife refuge, but they are beautiful and I’d guess the desire to see these creatures contributes to making this one of the most visited wildlife refuges in the county.

The refuge also has several prairie dog towns and I never tire of these cute rodents. Did you know that they are related to squirrels and chipmunks? Yes, they are all in the family Scuiridae. These were black-tailed prairie dogs, the only one that I think I’ve seen of the five prairie dog species in North America.

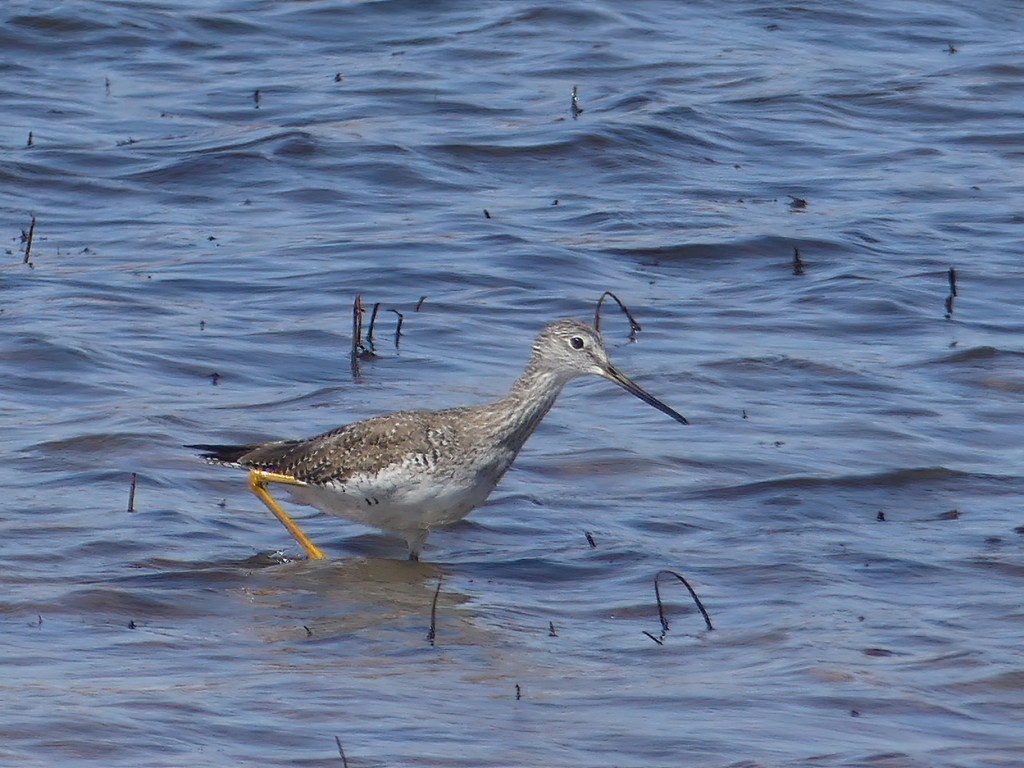
I did see a few birds, too, like the Greater Yellowlegs below, although I’m sure there would have been many more birds later in the year.

My favorite bird at Wichita Mountains was a single Ring-billed Gull proudly standing in the middle of a prairie dog town on the side of the road.

The next day I toured another wildlife refuge, Sequoyah NWR, near Oklahoma’s eastern border with Arkansas. I received a nice welcome from a flock of about 40 American White Pelicans that flew over as I drove into the park. This refuge had only a fraction of the visitors of Wichita Mountains on the day I visited. However, I met a couple of birders at the entrance kiosk and we birded a lovely path in the woods together. The rest of the refuge was mostly open and the next birds I saw were a large flock of Snow Geese.

It was interesting to see so many dark morph birds in the group. Snow Geese winter on the coast of North Carolina, but we rarely see a “Blue Goose” here.

In addition to birds, I saw a new and interesting turtle. Unfortunately, I focused my camera on the wrong one, the larger pond slider, a common and widespread species that I’ve seen many times. After submitting it to iNaturalist, I learned that the turtle on the right is an Ouachita Map Turtle. It is not rare either, but its range is the south-central part of the US and I’d never seen one before. And, what a cool name!

I saw about 35 species of birds at Sequoyah, mostly the same species that I can see in North Carolina. My last bird there was a Bald Eagle that flew over a pond filled with ducks and then landed in a tree by the road. I enjoyed the hours I spent at this refuge and would love to visit again.

After Sequoyah, all that was left was the uneventful drive to North Carolina. This was definitely my least birdy road trip ever, but I did manage to get both my Oklahoma and New Mexico lists to over 50 species. I also added several new counties even though you can drive for miles and miles in the West and see nothing. The map below shows every county in which I have observed birds. Good county birders have maps with clear, continuous lines representing travels. My maps look like an advanced version of connect-the-dots, but I try.

But more important than the birds was the amazing landscape that David and I saw in Utah and the fun we had exploring that part of our country. Visiting Arches and Canyonlands National Parks and Dead Horse Point State Park made this a trip of a lifetime.

Read Full Post »

Photographing birds is fun and it’s a great way to create wonderful memories of special birds and birding trips. It’s also a good way to learn more about birds. I’m not an expert, but I would like to share what I’ve learned. I just use a “point-and-shoot” camera, but these basics also apply to DSLR cameras.

I got my current camera (a Panasonic Lumix DMC-FZ150) about two years ago and I quickly learned that I rarely got good photographs with auto mode. I switched to program mode so that I could set the focus to a single area. This is probably the single most important thing to do – put your camera in any mode other than auto and use a single focus area. That’s all I did until recently and I got nice photographs of easy birds under good conditions.

American Woodcock. Program mode. Camera stabilized on the boardwalk railing. Image cropped, but no other editing.

American Woodcock. Program mode. Camera stabilized on the boardwalk railing. Image cropped, but no other editing.

Recently, I’ve become interested in improving my skills, so I had photography lessons with Tom Dunkerton  at Merritt Island NWR on my last trip to Florida. Tom set me in the right direction, made it fun and easy, and gave me confidence. I also found some great online tutorials on bird photography and bought a book. I’ll give links to these resources at the end of this post.

Green Heron. My favorite photo taken the day after my lessons with Tom Dunkerton.

Green Heron. My favorite photo taken the day after my lessons with Tom Dunkerton.

The first thing to work on is getting sharp, well-exposed images. As mentioned above, use a single focus area. On most cameras you can control the position of the focus area (it doesn’t have to be in the center of the image) and the size of the area. Focus on the bird’s eye. If the eye is in focus, the photo will generally be pleasing. Aperture mode is usually recommended for photographing birds. A wide aperture (low number) will increase the shutter speed, helping prevent blur caused by movement of the subject. It will also help to get a sharp image of the bird, but keep the background softly out of focus. Unless you are trying to create a shot showing bird habitat, a sharply focused background is distracting.

Red-bellied Woodpecker in my backyard. The light in the bird's eye makes this photo work.

Red-bellied Woodpecker in my backyard. The light in the bird’s eye makes this photo work.

It is also important to hold the camera as still as possible. Experts recommend using the electronic viewfinder rather than the LCD screen. That allows you to use your body to stabilize the camera. I’ve never been able to do that, so I put the camera strap around my neck and hold the camera away from my body so that the strap is tight. I hold my left hand under the camera to add additional stability and press the shutter with my right hand. Even better than hand-holding the camera is using a tripod, monopod, or some other stationary object to support the camera. Experiment – see what works for you.

Three things affect exposure – aperture, shutter speed, and ISO. A good basic ISO setting is 400. However, if you are shooting in low light, you may want to increase the ISO. When using aperture mode, the camera will automatically set the shutter speed. This works fine for most birds with good lighting conditions. But, white birds and very dark birds are more challenging. You may also need to make some adjustments if the light is not ideal. The easiest way to make adjustments is to use exposure compensation. To do this effectively, set your camera to display a histogram and learn to read it. It’s actually very easy and provides instant feedback on your exposure. It simply displays the tones in the image, usually from dark on the left to the lightest tones on the right. The goal is to keep the graph within the scale, as evenly distributed from left to right as possible, but not “hitting the wall” on either end. If the graph goes off the left end, the photo will be underexposed and details lost in the shadows. If it goes off the right end, some areas of the photo will be pure white and no post-processing can recover the blown highlights.  If the graph is too far to the left, increase the exposure compensation.  If it’s too far to the right, decrease the exposure compensation.

There is much more to learn about photography, but these basics will go a long way towards helping you get some nice photos that will add to your enjoyment of birds.

This Snowy Egret was a white bird with a dark background. An exposure compensation of -1 kept the details in the white feathers.

This Snowy Egret was a white bird with a dark background. An exposure compensation of -1 kept the details in the white feathers.

Here are a few more miscellaneous tips that I’ve recently learned.

  • Study your bad photos to determine what went wrong. Also, study your good photos to see what went right.  Use the EXIF data embedded in each photo to see the settings you used and how they affected the image.
  • Try turning off “image stabilization” in good light. I was amazed, but my images were sharper after I turned this setting to “off.”
  • Use burst mode. Any camera movement caused by pressing the shutter won’t be evident in the second and subsequent photos. It may also help you get the bird in a more pleasing position if it moves.
  • Take lots of photos. It’s not film. It’s free to shoot photos with a digital camera.
  • Use photo-editing software. Sure, you want to capture the best image that you can, but don’t be afraid to improve it with a little editing.

Pine Warbler (female). Even a simple image can be pleasing. This photo works because the background is out of focus.

Pine Warbler (female). Even a simple image can be pleasing. This photo works because the background is out of focus.

A few resources for bird photography:

  • The user manual for your camera.
  • Bird Photography Tutorials from Mike Atkinson.
  • Many excellent books on digital photography are available. I just bought The Beginner’s Photography Guide ($15.18 from Amazon) and I’m finding it to be extremely helpful.
  • Ask for help.  We have several skilled photographers in Forsyth County who are willing to answer questions, offer suggestions, and provide additional help.

Below is an example of learning more about birds through photography. I photographed this male Common Merganser in California a couple of years ago. When I looked at the photo, I was fascinated by the pattern on the breast. I never would have noticed or remembered this detail from just looking at the bird with my binoculars. Since then, experiences like this have been repeated many times.

Common Merganser (male)

Common Merganser (male)

Read Full Post »